Today’s topic is Easiest Way To Cut Tile Backsplash. Obviously, you can find a great deal of How To Cut Installed Tile By Hand-related content online. The proliferation of online platforms has streamlined our access to information.
There is a connection between the Easiest Tile To Cut and Backsplash Tile Cutter information. additional searching needs to be done for Cutting Backsplash Tile With Dremel, which will also be related to How To Cut Installed Tile By Hand.

116 Tips for Easiest Way To Cut Tile Backsplash | How to Cut Tile Without a Wet Saw
- Smooth: Finally, smooth out the edges of the tile. You can use the flat side of the blade, a rubbing stone, or sandpaper for smoothing. - Source: Internet
- Because manual tile cutters only cut straight lines, you’ll need something else for round holes. One of the cheapest and most effective ways to cut holes in tile is with a hole saw kit. They are multipurpose and will serve you for years. - Source: Internet
- Use a clean cloth to remove any excess sealer from the tile surface. You may also need a plastic scraper to remove any stubborn residue. Just be careful not to damage your new tilework! - Source: Internet
- Look to your tile details to find out what size spacers and grout you’ll need to use. This one suggested 1/16" grout lines. I thought about not using spacers at all, but decided in the end to use the them for a more uniform look. - Source: Internet
- A Glass mosaic tile is difficult to cut, as you can see through it. The coating on its back brings the tile’s color. This coating gets uneven cuts while using a tile saw (wet saw). - Source: Internet
- The best way to cut tile is with a wet saw. Wet saws are specifically designed for cutting tile, making quick work of even the most intricate cuts. If you don’t have access to a wet saw, you can also use a handheld tile cutter. - Source: Internet
- You can use nippers to cut smaller glass mosaic tiles. Hold the tile in the nipper blades. Make sure you keep the blade tips on the diagonal, aligning the tile with the cutting edges. Now, press firmly to cut the tile. - Source: Internet
- Glass, porcelain, and stone tiles provide gorgeous options for kitchen and bathroom tiling projects. However, cutting these hard materials can present a unique challenge. Although for the most part, cuts are easy to make with a diamond wet saw, cutting some curves or holes requires special techniques. For now, we’ll focus specifically on accurately cutting glass tile. - Source: Internet
- The first thing you should do is measure the object you need to tile around. This is most often a showerhead or nozzle. But it can be plumbing or something else entirely. You need to measure it and make a copy of that shape on cardboard. - Source: Internet
- In this method, you need to use a sharp cutting tool, place the tile on a worktable, mark the cutting line with a ruler, and glide the cutting tool along the ruler not too tight, not too loose. Then, place the tile on a soft surface keeping the cut at the top of it, and snap from both sides. You can attain a perfect and neat cutting of the tile with ease. This method is ideal for small-sized glass mosaic tiles. - Source: Internet
- You may also want to consider a tile backsplash that is heat resistant if you do a lot of stovetop cooking. You should also ensure that the backsplash tile you select is non-porous so it won’t absorb stains. So if you are a messy cook, a marble backsplash is probably not for you! - Source: Internet
- Snap: Place a wire hanger on a flat surface, and position your scored line over it. Using gentle pressure, push down on the sides of the tile to snap it. You can also use tile nippers to complete this step. - Source: Internet
- A wet saw is a power tool that uses a water-cooled diamond blade to quickly and precisely cut large quantities of ceramic, porcelain, glass, or marble tile. Tile is fed into the blade on a sliding table while a pump sprays water over the blade to keep it cool and control dust. Only make cuts if your blade is sharp and water is flowing properly over the blade. - Source: Internet
- Different jobs require different cuts. The material you’re working with as well as the shape of cut you need entails different methods and tools. To figure out how to handle all those different cuts, we’re bringing you this guide which will help you plan ahead of time - remember, you can never ‘uncut’ a tile! - Source: Internet
- Finally, don’t forget to consider your budget when choosing tile for your kitchen backsplash. There are many beautiful backsplash tile options on the market, but they can vary widely in price. Patterned tiles, stone tiles, and subway tiles are some of the standard options. - Source: Internet
- Once all of the pieces are cut to size, carefully apply the tile adhesive and place the pieces in the pattern of your design. Make sure to use a level to check for accuracy. Let the adhesive dry and apply grout, wiping excess away with a damp cloth. - Source: Internet
- A glass cutter is a hand tool with a rotating wheel that’s ideal for small cutting tasks that involve simple lines. It can be used to cut glass or ceramic tile cleanly without chipping but shouldn’t be used on corners or curves. Follow the steps below to use a glass cutter. You’ll also need a ruler, a pencil, a wire hanger, and an aluminum oxide rubbing stone or sanding sponge. - Source: Internet
- The expert recommendation when you’re opening a hole in a fixed tile is to put the drill to the tile at a 45-degree angle, pushing until it is at a 90-degree angle. Don’t push too hard, or the drill bit will be worn out too fast. Once you reach the end of your cut line, pull the tool out gently. Cutting past the marked lines may result in damaged tile. - Source: Internet
- If you’re fairly new to the tiling laying game, you’re forgiven if you think you need a wet saw to cut tile. You don’t. A wet saw can come in handy, but it’s not essential for every tiling job. We’ll walk you through the various options for cutting tile. Of course, if you need a tile tool, we have you covered. - Source: Internet
- Tile nippers are great for intricate, circular cuts on ceramic tile. Like the name suggests, they are designed to take “nips” out of tile as you work, letting you get it just right in tight spaces. Our 6370 Superior Ceramic Tile Nippers are made from premium American-made carbide tungsten steel. They are a nipper designed to last. - Source: Internet
- This tile is SO pretty!! It comes in cream, white, blue, gray and black. All are beautiful. I went with cream for many reasons, but mostly because our upper cabinets are not pure white. I worried the white tile would look off against them. - Source: Internet
- “How to cut a hole in tile” is probably in your recent searches. Out of all of the construction jobs that you can DIY, cutting and laying tile is one of the hardest. You need special tools for every step, the tile itself is expensive, and you have to know exactly how to lay the thinset. - Source: Internet
- Keep in mind that you may need to make adjustments for odd-shaped areas or cutouts for outlets. Once you have the square footage, add 10 percent to account for waste and mistakes. This amount is the minimum amount of tiles you should purchase. - Source: Internet
- I had a couple hiccups in this tile process along the way (I told you this room has given me one problem after another), because I didn’t order enough at first. I had to wait on backorders and then the second shipment was much shinier than the first. I was able to pick and choose out of the boxes to find some that matched better. (Buy all you need at one time so they are from the same lot!) But overall the install process was a breeze! I used a product that makes the tile installation SUPER quick and mess-free. - Source: Internet
- Applying Pressure - With a successful notching system in place, another way to prevent the likelihood of chips or cracks is by gently applying pressure while cutting the tile. The method is the same whether using a hand tool or a power saw. Apply an even amount of pressure from start to finish as your blade goes through the cutter. Gentle pressure ensures that your tile goes all the way through, from end to end, as smoothly as possible. - Source: Internet
- The tile backsplash is a vital design element in any kitchen remodel. It provides protection for your walls from splatters and spills and also lends a unique visual appeal to the space. With so many tile options on the market, it can be challenging to know where to start when choosing tile for your kitchen backsplash. - Source: Internet
- If the tile is glued down with an adhesive, carefully drill a hole at every corner of each tile. Be sure to keep the hole as small as possible to minimize possible damage. - Source: Internet
- On a side note: Adam informed me that professional tilers always start in the center and work their way out. This ensures that the tiles not only match, but it also makes cutting the corners easier (less measuring). I just started on one side an worked my way across. It looks fine, but I thought I’d pass along that little morsel of tile knowledge just in case. - Source: Internet
- If you’re putting in a new backsplash, you’ll need to cut it to fit your kitchen’s dimensions. The best tool for cutting backsplash tile is a wet saw. Wet saws are designed to cut through tile without chipping or breaking it. - Source: Internet
- Many glass tiles are clear throughout and have a coating on the back which gives them their color. This coating can chip off and become jagged from cutting on a wet saw (tile saw). Commonly, this will show when viewed from an angle. - Source: Internet
- A dremel can be used to create a hole in the center of a tile for pipes or valve fixtures. You can drill a hole into loose tile that hasn’t been installed or into fixed tile that’s already attached to a wall or floor. Dremels are ideal for ceramic tile, though with a diamond bit they can cut through porcelain or marble. Follow these steps to cut a hole in a tile with a dremel. - Source: Internet
- – metal is a relatively new material for tile. While it is durable in many cases, it can also dent fairly easily. Use it with caution to have some of the most beautiful and modern tile around. Resin – resin tile isn’t the most durable tile, but it is the most highly customizable. If you have a resin 3D printer, you can even print your very own tiles in your custom design and lay them yourself. - Source: Internet
- Now comes the tile-laying. You will lay your tile one or two at a time after you lay the thinset. It’s important that you remember to add spacers on every tile as you go. There should be at least two tile spacers on each side of the tile. - Source: Internet
- Cutting tile isn’t easy at all. You can get a simple tile cutter for $20 or less that can cut straight lines in medium to small tile. But when it comes to cutting shapes, things get very tricky. You can use just any old cutter. - Source: Internet
- Position: Place the tile on a flat surface. Place masking tape painter’s tape around the outer edge to prevent the glaze from chipping. Make sure you have the right blade depending on the type of tile you have (as mentioned above). Secure your tile with a clamp. - Source: Internet
- Also called a nibbling tool, tile nippers make small snips that larger tools can’t. This is ideal for irregular cuts such as curves, arcs, circles, notches, and other tiny cutouts. Nippers can be used to cut around toilet flanges, faucet valves, and door cases in ceramic tiles and some thinner porcelain or stone materials. They can’t be used for large, straight cuts, however. - Source: Internet
- Our IQ Power Tools iQTS244KIT is the world’s first dry-cut tile saw. It offers the benefit of a wet saw without slurry clean-up. On top of that, it comes equipped with vacuum and filtration systems that capture 99.5 percent of dust. - Source: Internet
- Grout the tile using a grout float. Starting at the top of the backsplash, work your way down, using a back-and-forth motion to force the grout into the spaces between each tile. Be sure to work it into all the nooks and crannies so that there are no air pockets. - Source: Internet
- Used for Which Materials? A snap cutter is mostly used to cut ceramic tiles that are up to 3/8 inches thick. Depending on the type of texture, you can also use it for cutting porcelain tile. A snap cutter may be used to cut marble tiles too - but only if it has tungsten carbide blades. - Source: Internet
- Additionally, snap cutters are a you-get-what-you-pay-for item. Good score-boards can run as much, or more than a tile saw. And they don’t even have a motor. Nonetheless, these are a good option for limited uses. - Source: Internet
- If you only have one tile to cut, like if the hole is near the center of a tile, then you will drill straight through. But a better way to prevent breaks is to have two tiles cover the hole. If they meet in the middle, it’s easier to cut without breaking it. - Source: Internet
- To start, use a carpenter’s square to draw a straight line along the surface of the ceramic tile. Cut the tile using a tile cutter, beginning with small incisions at each side of the line. Once the center of the tile has been cut, you can use a scribe to finish the incision. - Source: Internet
- With a Dremel tool, it is especially easy to cut holes. A Dremel tool allows you to drill holes in a fixed tile as well as make holes in a loose tile that has not been installed yet. Cutting ceramic tile with a Dremel is the easiest option, as other tiles may require a different bit. To cut a round hole in porcelain tile or in marble, a diamond bit is ideal to cut holes through those tiles. - Source: Internet
- Place the tile on the table keeping the required cutting line along the guiding ruler. Then, you need to pass the cutter through the cutting line applying slight pressure. This technique scores the tile along the desired cutting line. Finally, you can press the breaker against the cut tile to snap/split the tile along the cutting line. - Source: Internet
- If you want to know how to cut a tile without a wet saw, you can use hand tools that don’t require electricity. A manual tile cutter or snap cutter works well for the larger tiles that wet saws are typically used for. If you’re working with large quantities of tile, however, power tools are best. - Source: Internet
- If you have a wet saw or other power cutting tool, insert notches in the tile before cutting all the way through. This is called scoring. With a notch system in place, you can gently apply pressure while cutting with any tool to reduce the likelihood of chipping. Apply even pressure through the entire cut until you’ve gone all the way through the tile end-to-end. - Source: Internet
- Cutting glass tile can be a challenge. Yes, more of a challenge than cutting regular old ceramic tile. Additionally, the average DIY’er may not have the right equipment and may not know the tricks for how to cut glass tile. - Source: Internet
- An angle grinder with a diamond blade is a solid option for some of your smaller, more intricate tile work. It can be more difficult to get perfect clean cuts with your angle grinder, though it often comes in handy when doing tile work. But proceed with caution, here: Using an angle grinder to cut tile is a noisy and dusty affair. It’s critical that you wear proper safety gear; protect your eyes and ears and wear a mask, as silica dust can be extremely harmful for your lungs. - Source: Internet
- Cut your glass tile for the fireplace and other types of glass mosaic tiles upside down. The coating on the backside of a tile receives the abrasive penetration of the blade first. You can repair any slight chips on the transparent upper surface of the tile. - Source: Internet
- This is usually the easiest option for replacing a backsplash. However, for others that may involve intricate designs and complex patterns, it can be slightly more challenging. In any case, it is a project that requires careful attention and careful cuts. - Source: Internet
- You’ve purchased a new tile for your project. Maybe you’re renovating your kitchen with a new backsplash. Perhaps you’re upgrading your bathroom and shower. Or getting rid of all that carpet and redoing your living room. The only thing left to do is the installation, but it’s not so simple as laying the tile down, you’ve got to cut it to fit in some places! - Source: Internet
- Most tile cutting tools use the same process of measuring and marking the tile, snapping or cutting, then smoothing out the edges. Some projects may require multiple tools. To choose the right tile cutters for your tile installation project, know what type of tile you’re working with, how many tiles you’ll be cutting, and exactly what type of cuts you’ll need to make. - Source: Internet
- Push quite hard to keep the drill and tile steady and it should drill through in less than a second. That’s all there is to it. The hardest part aside from that is making sure the measurements are all correct and in place. - Source: Internet
- Next, narrow down your options by figuring out the sort of cut(s) you need (straight, angled, curved, etc.) and how many tiles you plan on cutting for the whole project. After you narrow down your options, you can finally decide on the right tool(s) based on your budget and personal preferences. But first, let’s see the purpose of each tool and how they work! - Source: Internet
- – ceramic tile is probably the most common tile in America. It is durable, easy-to-clean, and can be put in any room. It also comes in both glazed and unglazed, so check both options out. Glass – glass tile is perfect for areas that can be difficult to clean as it won’t stain. But it is easy to break so it isn’t great for children who tend to drop things or are rough around the tile. - Source: Internet
- When to Avoid? A snap cutter will not cut curves or bevels. Because it is a manual process, it’s not very ideal for large projects (such as large scale floor tiling projects). Although this tool is handy for making straight cuts, it doesn’t create perfectly straight lines like a wet tile saw. Ceramic or porcelain tiles more than 3/8 inches thickness, natural stone and marble tiles, and large format tiles shouldn’t be cut with a snap cutter - these tiles should be cut with a wet tile saw. - Source: Internet
- However, the score & snap method has its major drawbacks: you can’t trim a sliver of glass off the edge. In general, the cut needs to be about an inch or more in width. Another drawback is the inability to cut a notch out of the tile. If you need to do anything besides a straight cut then this isn’t the tool for you. - Source: Internet
- But there’s one problem: the tile doesn’t seem to fit perfectly in the space. Don’t worry; this is a common issue when installing tile backsplashes. The best way to deal with it is to cut the tile to size. - Source: Internet
- (As a note, you’ll see that with most of the tools, in general, have the same cutting process: Measure and mark the tile, snap or cut it, then smooth the edges. Also, some tile projects may need a combination of tools and techniques too. Let’s start.) - Source: Internet
- – glass tile is perfect for areas that can be difficult to clean as it won’t stain. But it is easy to break so it isn’t great for children who tend to drop things or are rough around the tile. Porcelain – porcelain tile is also very popular. It is similar to ceramic only it is made to look like natural materials like stone. It is more difficult to install than ceramic but is generally about the same all-around. - Source: Internet
- Tiles made of glass, metal, and natural stone are all popular choices. Each has its benefits and drawbacks, so it’s essential to do your research on backsplash ideas before making a decision. You’ll also want to consider whether you want handmade or mass-produced tiles. - Source: Internet
- An angle grinder is a handheld power tool ideal for curved, square, L-shaped, and circular cuts around doorways, vents, drains, and pipes. It requires less skill and setup than a wet saw, though it can’t handle large quantities of tile. Use a diamond-tipped blade for cutting ceramic or glass tiles, a notched blade for porcelain, and a serrated blade for marble or stone. - Source: Internet
- Snap: Squeeze the nipper’s handles forcefully to nibble the chips one by one. Take small nips, without going too fast so that you don’t risk breaking the tile beyond the mark. - Source: Internet
- Position & Score: If the area you’ll be cutting is far from the edge of the tile, consider cutting the tile down first. In that case, start with a snap cutter or a wet tile saw to score and cut off straight pieces. Then continue shaping your smaller area once it has been trimmed. - Source: Internet
- Manual tile cutters and snap cutters are safe, low-budget alternatives to power tools that can cut ceramic or porcelain tiles without electricity or water. They’re ideal for small projects with relatively few cuts and can make diagonal or angled cuts. However, they won’t cut curves or bevels and tend not to work for tiles over three-eighths of an inch thick. - Source: Internet
- No matter the room where you’ve installed the tiles, nor what materials or the finish or texture you’ve selected, it’s essential to maintain it as lovely as the day you’ve installed it. By spending a few extra minutes, you can protect against contaminants, stains, spills and the effects of time. To learn more about the best care and maintenance of your tile, always check the manufacturer’s recommendations and if you have any additional questions, contact us. - Source: Internet
- Then, you can start testing out the hole saw heads that you have. Find the one that is the closest in size, giving a tile bit extra room. After you choose a bit, it’s time to start cutting the tiles to fit. - Source: Internet
- There are many different materials of tiles. The two most common being porcelain and ceramic. It can be hard to choose between tile materials if you don’t know the pros and cons of each. Here are a few pointers to help you out. - Source: Internet
- Whew, I’m almost done with my latest room update! I’ll share links to all of the projects I’ve completed in our laundry/mud room at the end of the post – just in case you missed one. Can’t have that. The tile project I’m sharing today is one of my favorites I’ve ever done – first of all because it was SO easy (I’ll share why in a minute) and because it is beautiful! - Source: Internet
- Position: Place the tile on a flat surface, and use a square ruler as a guide for your glass cutter. Always set your square ruler slightly off the marked line (less than ¼ inch) so the cutter hits the right place. - Source: Internet
- The thing is, authentic Zellige tile is handmade from clay and has an imperfect look that I don’t always love. Also, it’s usually installed very close with small grout lines (which adds to the imperfect look). I’ve always preferred the more uniform versions I’ve seen, with a bit of contrast with the grout. - Source: Internet
- Ceramic – ceramic tile is probably the most common tile in America. It is durable, easy-to-clean, and can be put in any room. It also comes in both glazed and unglazed, so check both options out. - Source: Internet
- Used for Which Materials? A tile nipper is commonly used with ceramic tiles. It can also cut thinner porcelain, concrete, or even some natural stone tiles but beware that you need a quite firm grip and squeeze to cut those materials. It’s also useful for tiles with smaller sections, such as mosaic tile sheets. - Source: Internet
- The first thing you will do after laying a subfloor is lay your thin-set. You won’t do this all together for two reasons. First of all, if you do all the thinset before laying any tile, you won’t be able to walk on your floor. - Source: Internet
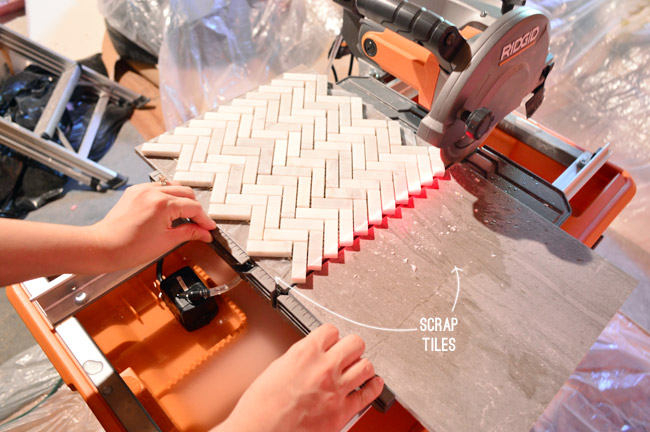
- The only issue I had was cutting smaller slivers of tile. I found that if I scored it with the same pressure from the bottom to top, I could get pretty small cuts. **Always order about 10 percent more tile than you’ll need! - Source: Internet
- Grouting isn’t really hard – just smush it in there. Fifteen to 30 minutes after, use a large sponge and a bucket of water and start wiping it off of the tile. If there are any spots you missed with the grout, you can usually move it around and fill in with the sponge. - Source: Internet
- When it comes to tile backsplashes, the devil is in the details. Just a few millimeters off can mean the difference between a tile that looks flawlessly installed and one that looks wonky and out of place. That’s why it’s essential to take your time and draw your center point and measuring lines correctly. - Source: Internet
- Position & Score: Place the tile on a flat surface, glazed side up, beneath the cutting wheel. Starting at the edge of the tile, press the carbide scoring wheel firmly across the face of the tile, until you score a straight line. It may require a second pass of the cutting wheel to start a line, but don’t attempt multiple passes as too many scores will chip the edges. - Source: Internet
- Smooth: Smooth out sharp cut edges to ensure there are no cuts or snags. Use your rubbing stone (aluminum oxide stone) to file glass tile edges as well as high fired porcelain. - Source: Internet
- As you can see, there are various tools to use for cutting tiles based on the type and number of tiles, as well as the kinds of cuts you want to make. Consider your factors and pick the one that fits your needs to ensure a professional result. Initially, you might break a tile or two, but that’s okay! With time, you’ll be an expert. If you have any doubts regarding the usage of any tool, let us know in the comment section for further guidance! - Source: Internet
- This method is suitable for bigger jobs that involve a great amount of tile, but one has to be experienced to use a wet saw. Their tile cuts are extremely precise - not only can they be cut to your exact measurements, but they create a smooth, straight edge. Wet saws can even cut tile trimmings with bullnose or quarter-round shapes. When Does it Work Best? Wet saws are great for bulk projects! If you’re cutting a large amount of tile, or need corner cuts around door jambs and wall outlets, this is the tool for you. - Source: Internet
- It’s almost inevitable that you’ll have some sort of notch cut to make. Especially if you are installing a kitchen backsplash. Trying to navigate through the myriad of cabinets, windows, and outlets makes for plenty of notched cuts. - Source: Internet
- But the hardest thing to do right without making mistakes is to cut the tile. Hiring a professional is always preferable if you can afford it. But if you’re feeling bold, learn how to cut and lay tile on your own. - Source: Internet
- This is a tile setting mat, you use it instead of thinset mortar to adhere your tiles to the wall. This saves you at least 24 hours and is super easy. Here is what it looks like close up… - Source: Internet
- Make Shallow Cuts - You don’t want to cut too deeply, or you ruin the structural integrity of the tile itself! Cutting shallow and slow will prevent the tile from chipping. It’s important to adjust your blade to make ⅛” deep cuts. Anything more, and you may damage the tiles! - Source: Internet
- Measure & Mark: Mark the line on the tile where you want to make a cut. You can also use a compass, or round objects such as cans or lids to draw a curve or semicircles. - Source: Internet
- You will need to lay something under the tile to steady it and protect the floor, drill bit, and the tile itself. This acts as a cushion for all three. Drywall does a great job of this. Then, putting a knee or hand on the tile, start drilling. - Source: Internet
- Grouting tile can be a hassle. While it isn’t as structurally important as thinset, it is what people will see and can be the difference in your project having a short or long life. So learn to apply it correctly. - Source: Internet
- Cutting ceramic tile without chipping it can be a separate challenge. That’s why experts have invented methods for cutting tile that can prevent chips and breaks. Here are a few methods to prevent chips during the tile cutting process if you’re working with ceramic tiles. - Source: Internet
- Cutting and installing tile yourself is a labor-intensive project that may require you to invest in some tools you don’t already have. If you want a beautiful tile wall, floor, or backsplash, you’ll need to make precise cuts. DIYers with prior tiling experience tend to get better results. - Source: Internet
- Measure the area where the tile will go. You’ll need to know both the space’s width and height to calculate how many tiles you’ll need. Remember, make sure to measure twice and cut once so you don’t waste any tile - Source: Internet
- For best results, we recommend sealing your tile grout. Grout is a porous material that can absorb spills and dirt, making it difficult to keep your backsplash clean. By sealing the grout, you create a barrier that will make it much easier to wipe down your backsplash and keep it looking great for years to come. - Source: Internet
- If you feel like your tile is a little lifeless and dull after installing you might want to use a grout haze remover to shine it up a bit, then give it a good coat of sealer. (A reader said that plain vinegar works just as well as grout haze remover. Vinegar is awesome.) - Source: Internet
- Below are 7 tips on how to cut glass tile. You will have to pick and choose which ones are applicable to your scenario. For example, many tile saws don’t have the plunge feature which will limit some of the options. - Source: Internet
- Snap: After scoring the line, lift the handle and let the pressure down onto the center of the tile. Apply a firm and gentle pressure to the handle. If your tile was properly scored, it will snap easily. - Source: Internet
- Next, score the grout using a grout saw or a putty knife. Gently pry up the tile starting at the edges and work your way towards the center. - Source: Internet
- You can use a few different methods to cut ceramic tile without chipping the edges. Start by fixing a piece of masking tape along your guideline mark to make the line easier to follow with your tool. Making slow, shallow cuts will help prevent chipping. Cuts that are an eighth-inch deep are best. - Source: Internet
- There are a plenty of cheap non-electric options, like this super cheap tile scorer, or this better one, or this larger non-handheld version. With all of these you basically just make a cut, (score the tile), then break it…wearing gloves and safety glasses if course. Don’t worry, it sounds scarier than it is. - Source: Internet
- You need special cutters for cutting shapes or holes in the tile. Otherwise, you’ll break the tile or leave an ugly hole inches away from the object you’re cutting around. This is the fastest way to ruin your perfectly good project. - Source: Internet
- Removing backsplash tile without damaging drywall is possible, but it does require a certain level of skill and care. The most important aspect of the removal process is to take your time. Here are some steps to guide you: - Source: Internet
- The first step in laying tile is making sure that there is a good subfloor for it. Or underlayment for some projects. There are many different types of shower boards and tile boards, so do your research to find out which one works for your project. - Source: Internet
- So, go ahead and be bold! Get that project started and feel good about yourself whenever it’s done. But don’t forget to enjoy the process. Even if cutting tile feels like the end. Because it will be a masterpiece in the making. - Source: Internet
- Schluter strips are thin strips of metal or plastic that are used to create a smooth transition between two different surfaces. They can also be used to protect tile edges from chipping and provide extra support for heavy tile installations. When choosing a Schluter strip for your tile backsplash, select one compatible with the type of tiles you use. - Source: Internet
- Applying tile grout is a crucial step in any kitchen remodel that involves tile. Grout helps fill in the tiles’ spaces and create a watertight seal. Without grout, your tile backsplash would be much less effective at protecting your walls from water damage. - Source: Internet
- Sometimes, you’ll find yourself in a situation where you need to drill right through the center of a piece of tile. In those instances—whether you’re putting a faucet in your bathtub or drilling through floor tile to run plumbing—you’ll need a hole saw. Our Rubi Tools FORAGRES Diamond Hole Saw Drilling Kit is replete with the type of heavy-duty diamond drill bits designed for drilling through hard materials. A wet saw isn’t the only game in town. These options will get you moving ahead on your tile work, even without the benefit of a wet saw - Source: Internet
- The type of tile that you choose matters. Especially if you have to cut that tile, which you will have to in most cases unless your room or shower is just the right size. Tiles come in all sizes, with most of them being square or with a 2:1 ratio. - Source: Internet
- A hole cutter can cut perfectly round holes in tile in seconds. You choose your size and cut the hole just like it’s a hole punch. Only it normally uses a drill to cut these holes, which you probably already have on hand. - Source: Internet
- Now it’s time to get down to the nitty-gritty. Let’s talk about how to actually cut the tile. When it comes to straight cuts, it’s pretty simple. But when it comes to holes, things get quite complicated. A hole cutter is your best option. - Source: Internet
- These are simple cutters that cut straight lines in tiles are pretty easy to use. For a guide on tile cutters and the best ones that you can buy, check out this tile cutter buying guide. Or, simply buy any standard tile cutter from a trusted brand. - Source: Internet
- With a standard tile cutter, you simply place the tile under the cutter and score it with the scorer. Then, you press down to cut the tile on the scored line. It is easy to do and works with almost any kind of tile. - Source: Internet
- If you’re doing a DIY tile installation, you’ll likely need to cut a few tiles to fit into corners, along fixtures, and into other irregular spaces. There are many ways to cut tile, some of which work better than others in certain situations. This guide breaks down the six most commonly used tile cutters to help you choose the best tools and techniques for your specific project. - Source: Internet
- Buying a tile cutter is important if you plan on cutting holes in tiles. Even if you know how to cut holes in tile, you need a tile cutter. But knowing which one is right for your project isn’t easy for anyone. - Source: Internet
- For drilling, use protective eyewear and hearing protection and mark the tile with a wax pencil. This will prevent chipping and scratches while drilling. Be sure to slowly move the drill around the tile and slowly increase the speed as the bit breaks through the tile. - Source: Internet
- My issue with not using the wet saw was cutting around outlets. With a tile saw you can tilt the tile toward the blade for complex cuts. There are other ways to do it too – I was about to run out and buy a diamond blade for my Dremel tool when I noticed something as I was cutting with the tile cutter… - Source: Internet
- Score: Place the scoring tool on the marked line, starting at the edge of the tile. Press down the cutter as you move across the tile - the goal is to score a line without cutting all the way through. If you hear a scratching noise as you move the, it means your tile is being scored! - Source: Internet
- Measure & Mark: Mark the desired shape (circular shape, square, semi-circular, etc.) you want to cut on both sides of the tile. - Source: Internet
 Following are some suggestions for where to begin your search for data on best way to cut back splash tile:
You should try to find How To Cut Tile Around Outlets-related information from reputable places. Libraries, online resources, and even paid journalists all fall under this category.
- It's crucial to be aware of the various electronic media sources available when researching how to cut tile backsplash on wall, such as Google and YouTube. You may also get info about How To Cut Installed Tile By Hand on social media sites like Facebook and Twitter.
Following are some suggestions for where to begin your search for data on best way to cut back splash tile:
You should try to find How To Cut Tile Around Outlets-related information from reputable places. Libraries, online resources, and even paid journalists all fall under this category.
- It's crucial to be aware of the various electronic media sources available when researching how to cut tile backsplash on wall, such as Google and YouTube. You may also get info about How To Cut Installed Tile By Hand on social media sites like Facebook and Twitter.It’s crucial to read to examine the authenticity of each source in order to acquire the greatest information regarding how to cut tile backsplash on wall.
Video | Easiest Way To Cut Tile Backsplash
You’ll learn more about How to Cut Glass Tile- 7 Tips Revealed- video after watching the films included in this post, which come from a variety of different sources. Information on a wide range of topics can be easily accessed via the internet.
## Notable features of Cutting Backsplash Tile Around Outlets include:- Easiest Way To Cut Tile Backsplash
- Best Way To Cut Back Splash Tile
- How To Cut Tile Backsplash
- Best Way To Cut Tile Backsplash
- Best Way To Cut Glass Tile Backsplash

With the abundance of How To Cut Backsplash Tile That Is Already Installed-related resources available online, it’s easy to find what you’re looking for.
This is not how most people would expect to learn more about How To Cut Existing Tile Backsplash, so be prepared for some shock value. It paves the way for a closer examination of the How do you cut the small tiles attached to the mesh? information’s actual substance and its potential applications.
 techniques for making Cutting Backsplash Tile With Wet Saw data visualizations that are both aesthetically pleasing and practically applicable. They can spread the word about How To Cut Ceramic Tile That Is Already Installed in professional and promotional settings. For this reason, we also include Cutting Backsplash Tile Around Outlets-related pictures.
At last, this article sums up key points about How do you cut tile for a kitchen backsplash?. There is also a comparison of your Easiest Tile To Cut knowledge to that of How To Cut Backsplash Tile Without Wet Saw, as well as a discussion on How To Cut Installed Tile By Hand and Backsplash Cutter Tool.
